Sales Estimates
Orders that are created in IntelliTrack or QuickBooks Online flow back and forth between the applications when the Plugin is used.
- IntelliTrack Picking Orders are exported to QuickBooks Online as a Sales Estimate and an invoice is created for the order.
- QuickBooks Online Sales Estimates that are marked as Accepted are exported to IntelliTrack as open Picking Orders.
Important: The Plugin Host Utility only imports inventory-part type items into IntelliTrack; non-inventory parts or assets are not imported into IntelliTrack.
Important: The IntelliTrack Picking Order is exported to QuickBooks Online after it is fully picked in IntelliTrack.
Important: A QuickBooks Online Sales Estimate must be marked as Accepted in order to be imported into IntelliTrack.
Warning: Processing an order in QuickBooks Online may cause the order to become out-of-sync with the IntelliTrack order. We do not recommend processing a Sales Estimate in QuickBooks once the order has been imported into IntelliTrack.
Best Practice Recommendation for Order Numbering
Note: We recommend creating the order in QuickBooks and then processing it in IntelliTrack. This will ensure that duplicate order numbers are not created and that the inventory is accurate.
If you need to create orders in both IntelliTrack and QuickBooks you must keep the order numbers different by using the order auto-numbering feature in both IntelliTrack and QuickBooks or by keeping the order numbering apart from each other so that it will be less likely for a duplicate order number to be used.
Picking an Order
You are able to create or update an order in IntelliTrack and post it back and forth between QuickBooks Online and IntelliTrack using the Plugin. The order posts back to QuickBooks Online after it is fully picked and automatically closed in IntelliTrack.
The orders are posted automatically or manually depending on your setup.
- Manual Posting ON: When the Manual Posting to QuickBooks setting is ON in the Plugin\Basic Configuration tab\QuickBooks Settings, the orders are posted to QuickBooks manually at the Order Posting & Invoices tab in the Plugin.
- Manual Posting OFF: When the Manual Posting to QuickBooks setting is OFF in the Plugin\Basic Configuration tab\QuickBooks Settings portion, the orders are posted automatically to QuickBooks during the auto sync. The auto sync is based upon the Sync Interval set in the Plugin\Basic Configuration tab\Synchronization portion.
Importing a Sales Estimate in IntelliTrack
When a Sales Estimate from QuickBooks Online is imported into IntelliTrack, it is placed in the Picking Orders list as an open Picking Order.
Note: The Sales Estimate number in QuickBooks becomes the Picking Order number in IntelliTrack. This means that when you create a Sales Estimate in QuickBooks Online that has the number 1000 and import it into IntelliTrack as a Picking Order, the Picking Order number is also assigned the number 1000.
When a Sales Estimate is imported into IntelliTrack, you may view, edit, and close the estimate and then export it into QuickBooks Online. In IntelliTrack, the Sales Estimate from QuickBooks Online is found at the Picking Orders page.
- To review the picking orders in IntelliTrack, select Orders > Picking from the navigation pane. The Picking Orders page appears.
- Click the drop-down arrow in the Order Number field. A drop-down list appears. The imported QuickBooks Online Sales Estimates appear in the list.
Order Details
When a Sales Estimate is imported into IntelliTrack, the order details correlate to the order details in QuickBooks. This includes:
- Estimate Number
- Customer
- Inventory Part Item
- Quantity
To view the QuickBooks Online Sales Estimate details in IntelliTrack, go to the Picking Orders page.
- To view the details for a specific Sales Estimate, click the drop-down arrow in the Order Number field. The list of available Picking Orders appear.
- The Sales Estimate number in QuickBooks Online correlates to the Picking Order number in IntelliTrack.
- The customer for the Picking Order is the customer for the Sales Estimate in QuickBooks Online.
- Select the order from the list.
- The order information populates the page.
- The inventory part type item or items in the Picking Order are imported from the Sales Estimate in QuickBooks Online.
- The Ordered Quantity amount in the IntelliTrack Picking Order is the Quantity amount from the QuickBooks Online Sales Estimate.
IntelliTrack Picking Order Posting to QuickBooks Online® via the Plugin
A Picking Order that is fully processed and automatically marked as Closed in IntelliTrack is exported to QuickBooks Online. In QuickBooks Online, the original Sales Estimate is marked as Closed and an Invoice, which is linked to this Sales Estimate is created in QuickBooks Online.
Important: The Picking Order in IntelliTrack must be fully picked and automatically marked as Closed in order to be exported to QuickBooks Online.
Posting Orders
Orders are posted automatically or manually to QuickBooks via the Plugin.
Important: When you use the manual posting option, the Picking Order is not posted during the auto sync. The order must be manually posted from the Order Posting & Invoices tab in the Plugin.
Automatic Posting
The orders are automatically posted to QuickBooks Online when auto syncing is implemented and the Manual Posting checkbox in the Basic Configuration tab\QuickBooks Settings portion is not marked. This means that any orders ready for posting will automatically be posted back to QuickBooks Online during the next auto sync.
Manual Posting
When you use manual posting of orders, the orders are manually posted to QuickBooks Online from the Order Posting & Invoices tab. Manual posting may be used with auto syncing (between sync intervals) or manual syncing. However, when you turn Manual Posting ON, you must always post the orders at the Order Posting & Invoices tab. To set up the IntelliTrack Plugin for manual posting, follow the steps below.
- To use manual posting, go to the QuickBooks Online Plugin\Basic Configuration tab\QuickBooks Settings portion.
- Mark the Manual Posting to QuickBooks checkbox.
- Click the Save Configuration button to save this setting.
Dispatching Picking Orders Manually
Orders that have been changed in IntelliTrack are manually exported to QuickBooks Online via the Order Posting & Invoices tab in the Plugin. To manually post an order, follow the steps below.
- Make sure the orders are in sync between the two applications.
- If you do not automatically sync the data (via a Sync Interval timer setting set at the Basic Configuration tab in the Plugin), sync the order data by clicking the Synchronization tab and selecting the Synchronize Picking Orders button. This will cause the orders between QuickBooks Online and IntelliTrack to be in sync.
- If you automatically sync the data via a sync interval timer setting, the orders will automatically be in sync with each auto sync.
- Next, click the Order Posting & Invoices tab.
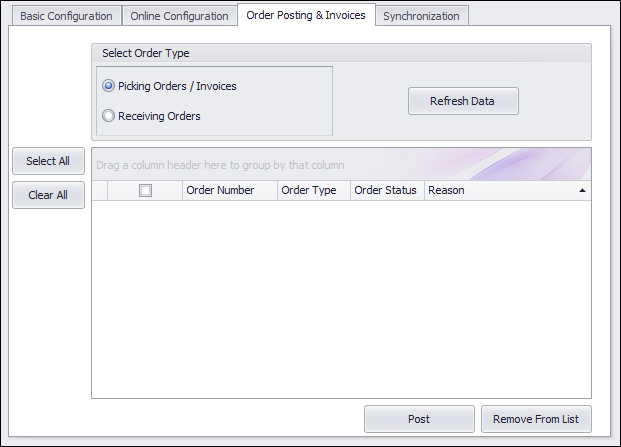
- To view the most up-to-date list of available Picking Orders for posting, select the Picking Orders/Invoices option in the Select Order Type portion of the tab and then click the Refresh Data button to update the available picking orders in the form.
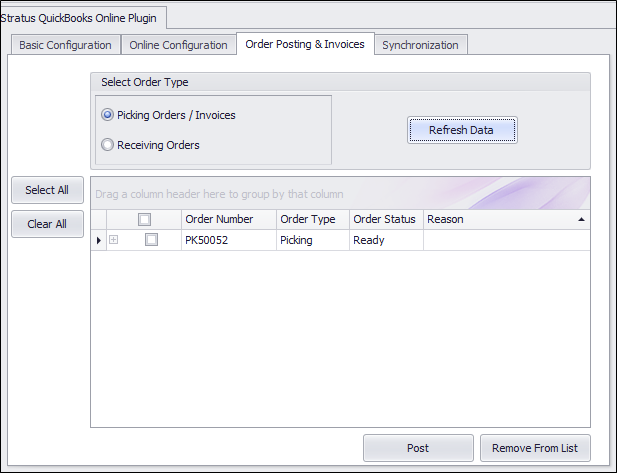
- To post a picking order, mark the Selected checkbox next to any order that has a Ready status. To select all the orders that are ready, click the Select All button. (To clear the selection or selections, click the Clear All button.)
- Click the Post button to post the selected orders. While the selected order or orders are posting to QuickBooks, the status bar along the bottom of the plugin will notify you with this message: Posting Orders. When the order is posted, it will notify you with this message: Posting orders completed.
- If the order is successfully posted, the order status updates to Posted.
- If the order is not successfully posted, the order status updates to Failed; the Reason field contains an error message. When the post fails, the order will not be exported to QuickBooks and must be manually reconciled in QuickBooks.
- After the order is posted, it may be removed from the list. In the Select Order Type portion of the form, select the Picking Orders / Invoices radio button.
- Click the Refresh button. The order list is refreshed. The Post button and the Remove from List button becomes enabled.
- To remove a posted order from the list of orders, mark the Selected checkbox next to each order that you want to remove.
- Next, click the Remove from List button. The Plugin notifies you that the orders are being removed from the list; it also notifies you when it completes this request.
- Next, click the Refresh Data button. The orders are removed from the list.